Perfecting Your 3D Prints: The Importance of Getting the First Layer Right with Maxxeshop3d 3D Printer Filament
Achieving flawless 3D prints starts with a solid foundation, and that foundation is your first layer. Whether you're a seasoned 3D printing enthusiast or a beginner, getting the first layer right is crucial for the success of your project. In this blog post, we'll explore the importance of setting your first layer correctly when using Maxxeshop3d 3D printer filament and provide you with some essential steps to ensure a smooth start to your 3D printing journey.
The Importance of a Perfect First Layer:
1. Adhesion: The first layer is responsible for adhering your print to the build surface. If it's not properly adhered, your print may come loose during the printing process, leading to failed prints and wasted filament.
2. Surface Finish: A well-set first layer contributes to a smooth and even surface finish. It lays the groundwork for the rest of your print, ensuring that subsequent layers are accurately positioned.
3. Print Stability: A properly calibrated first layer provides a stable base for your 3D printer to build upon. This stability minimizes the risk of layer misalignment, warping, and other common printing issues.
Steps to Ensure Your First Layer is Set Correctly:
1. Bed Leveling: Start by ensuring that your print bed is level. Use a leveling tool or follow your 3D printer's instructions to make sure the nozzle is at the correct distance from the bed at all points. An uneven bed can lead to inconsistencies in the first layer.
2. Extruder Calibration: Check and calibrate your extruder's steps per millimeter settings. This ensures that the correct amount of filament is being extruded during the print. Maxxeshop3d filament works best with precise extrusion settings.
3. Temperature Settings: Follow the manufacturer's recommendations for temperature settings when using Maxxeshop3d filament. Each filament type may require different temperatures, so be sure to adjust accordingly.
4. Print Speed: Slow down your print speed for the first layer. A slower speed allows for better adhesion to the build surface and reduces the risk of mistakes. Maxxeshop3d filaments generally work well with moderate printing speeds.
5. Bed Surface Preparation: Depending on your print bed type (glass, PEI, BuildTak, etc.), ensure it's clean and properly prepared. Some surfaces may require the application of adhesion aids like glue sticks or 3D printing adhesive solutions.
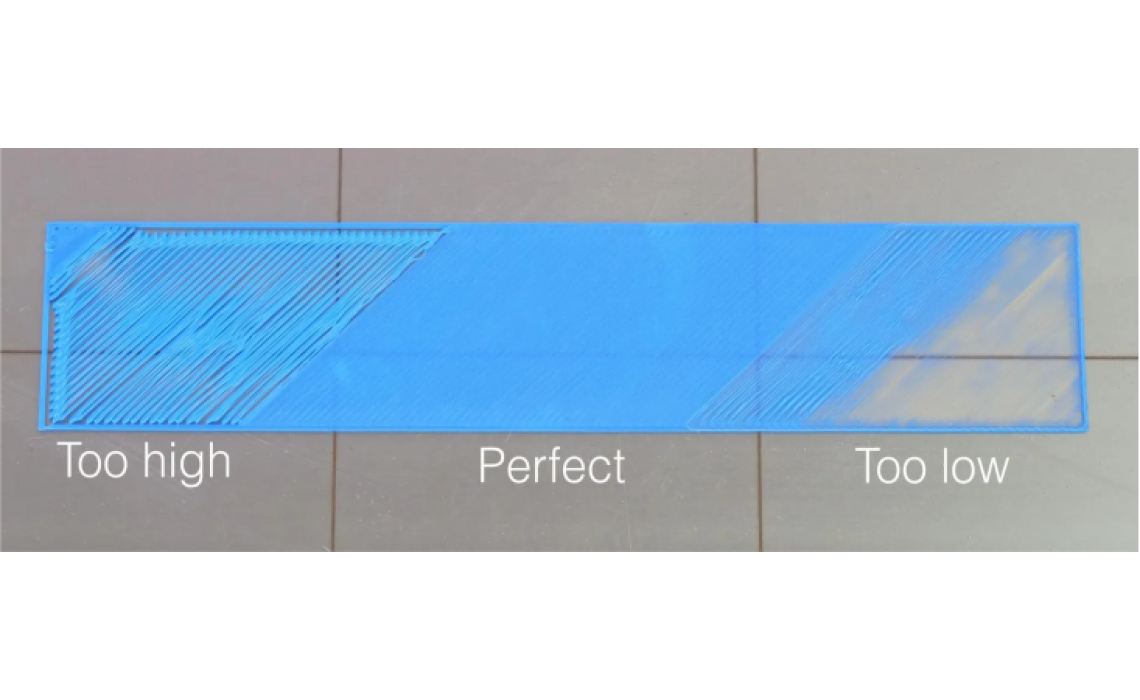
6. Live Z-Adjustment: Many 3D printers offer live Z-adjustment features, allowing you to fine-tune the nozzle-to-bed distance during the first layer. Use this feature to make real-time adjustments for the perfect first layer.
7. Monitor the First Layer: Pay close attention as the first layer is being laid down. Look for even lines, proper adhesion, and any signs of over-extrusion or under-extrusion. Adjust settings as needed.
8. Practice Patience: Achieving the perfect first layer may take a few attempts and some patience. Don't be discouraged by initial failures; it's all part of the learning process.
Conclusion:
When it comes to 3D printing with Maxxeshop3d 3D printer filament, nailing the first layer is the key to success. By following the steps mentioned above and dedicating time to calibration and adjustment, you'll set the stage for high-quality prints with excellent adhesion, surface finish, and stability. Remember, practice makes perfect, so don't hesitate to experiment and refine your first layer settings until you achieve the results you desire. Happy printing!


